From Model to Manufacturing: An Examination of the HOWIN L6 210 Straight 6 En
The HOWIN L6-210 21cc Straight-six production version and the prototype sample engine are compared in this chart. Four-Position Building Kits for Model Gasoline Engines 13500 rpm water-cooled, according to what Dennis's video showed.
Please watch the video or visit the blog below for further information.
Feature-Prototype engine sampleVersion in production
Head colour varies from blue toNot stated
Size of headsmaller head Not mentioned
Taller valve cover sizeNot stated
Locked valve cover: Nonepossesses a locking lip
type of plugtiny plugsNot stated
O-ring varietyRubber O-ring gaskets
Shaft of the rocker armmendedadjustment-nut-equipped studs
Guides for push rodsNot statedBeautifully brushed bronze cylinder chamberNot statedCleaner: None; Side coverfastener with lifters installed inside
CamshaftNot a bearingpossesses a logbook and a bearing.
There is no numbering when the rings are reinserted into the cylinder bore.
Engine name not givenHOWIN engine with a side print
Case of the distributordistinct overall and with an upgraded distributor
Not specified Hall sensorIt is more outside and has a tiny hole.
Timing adjustment for distributorsInternallyAdaptable externally
principal backingBronzedependable bronze
Note: Certain information is indicated in the chart as "Not specified" because it was not included in the text.
This movie compares the production-ready HOWIN engine Straight-six Four-Stroke Gasoline Engine Model Building Kits with the prototype sample engine. I received this Howin Engine as a test engine so that I could record a film and share my opinions. To demonstrate to everyone the engineering process involved in taking a concept from sample to testing to final production engine, I would like to present both the test prototype and the final production version.
I would enjoy a test engine since it allows you to have a creative outlet of sorts, and the finished output was very amazing. Who would have imagined that we would have something of this nature at this point?
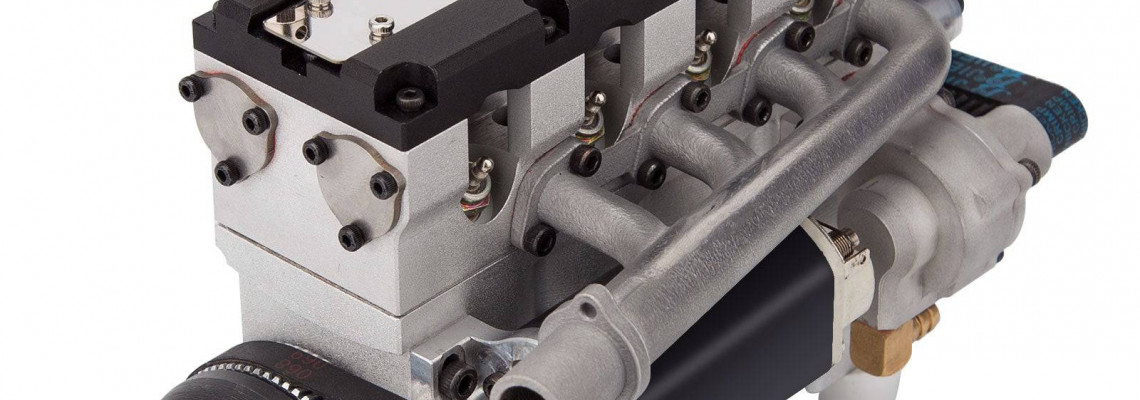
They made a lot of adjustments, so let's begin at the top of the block. The production Stone head is smaller than the prototype, and its valve cover is taller than its head. These are the first differences you'll notice. It is the same height when comparing apples to oranges, but the head is somewhat shorter and the valve cover is little taller.
An further enhancement is that the valve cover now includes a locking lip, which increases security compared to the previous design when the cover just sat on top. Additionally, it keeps oil and grease from leaking out the sides and creating a mess.
The intake and exhaust manifolds of this new HOWIN RC L6 FORD L6 300 engine are sealed with rubber O-rings and tiny plugs. The new engine's rubber O-rings offer a better seal for the intake than the previous engine's through-the-side gasket. Another advantage is that the new engine's fixed rocker arm shafts can be adjusted by slightly unscrewing the screw; the old engine's shafts were fixed and could not be adjusted.
The new HOWIN L6 engine has a cleaner combustion chamber. The close-up photo shows the bronze push rod guides inside the engine. The new production engine has adjustable studs with nuts. This feature lets you change the position of each rocker arm individually. The overall look is extremely good.
One of the modifications I've noticed is the one up top. As we descend, you will notice that the camshaft is missing its side cover and is instead equipped with two square blocks that screw in with hooks.
This camshaft has a journal and bearing that rotate and fit tightly in the block, stopping it from bending or flexing under pressure. As a result, the side cover really bolts to the side in the same manner as an actual engine. You may remove it and place your lifters inside these bronze tubes.
In order to ensure that the rings fit back into the cylinder bore, I numbered my block. The HOWIN engine is printed on the side beneath it.
I did observe that these journals had little holes inside of them. Each book has a small angle in it, and it appears that the holes were left unopened. It seems like they wanted to use an oil gallery to lubricate these parts. But since it's blocked off, they are developing a method to spray oil inside to lubricate the lifters, camshaft, and push rods.
It's really up to you what you want to do, although there is a small opening for a nipple on the side cover at the right back here. Running oil through this gallery won't help because someone removed the small holes where oil used to leak. It's not needed.
They have an upgraded distributor here, and the front distributor case is completely different on this thing. As you can see, the HOWIN has been completely upgraded.
The small hole on the right is for the hall sensor. I saw that the hall sensor has been moved closer inside the distributor, which is a nice change. This one also comes with all the necessary wires.
And as you can see, it is movable. While some include holes where you can change the distributor timing externally, this one did not. It's quite cool to see that I wanted to show you that you have to alter your distributor timing from the inside. As you can see, the slots were on the inside case, so you had to pull everything back off.
This one utilises your crankshaft's reliable bronze main support. These seem to be in widespread use these days since they function. We have main caps that fit inside and turn to support the crankshaft and hold the bronze bushings in place.
Now, you can see that the camshaft and crankshaft timing gears have marks on them. There are three marks on the camshaft, two marks on the crank, and one mark up here—oh, it's just a piece of post—where you set your time. In contrast, the crankshaft has one mark where you set your timing.
From what I've seen, the small dot on your crankshaft fits between the two women-like structures to create a three-position notch. I had to manually turn the camshaft on my engine to figure out the cam timing, which took some time. That's what I observed.
Other than that, it still has the good one-way bearing starter on the gear-driven device instead of a belt. Much of the other material has been expertly machined, ensuring a seamless fit. Because this was a sample prototype engine, I had to tap several holes and hand fit nearly everything.
These are just a few of the things I noticed right away, including the crankshaft on the rear. This weekend, I'm going to put everything together and get it going.
The Three-way Nozzle, Radiator Support Holder Kit, Water Tank Water Pipe Kit, CDI Ignition Compartment, and Inch Thread 3/16-40 Spark Plug are the parts of the ignition kit that I'm still waiting on; they should arrive soon.The crankshaft on the prototype is four millimetres, while the production version's crankshaft is five millimetres. This is a good thing because five millimetres is typically the standard when connecting something straight to a drive shaft or a universal joint. That's cool, I really like that, and the crankshaft quality is excellent.
Each journal on this site is six millimetres in diameter, allowing enough space for oil without spilling. There are 599 journals in total. I checked every journal on this site, and they are all 599.
Apart from that, it included belts, an oil pan, head gaskets, and a full gasket kit. These are the Teflon-style gaskets; the front timing cover includes a paper one as well, but the Teflon ones are great because they can be reused often.
Here's what I saw on the front cover, and it's something else I noticed that got me really thrilled when you put your time all together: you have to oil it.
There's a small notch at the bottom that goes into the block, and an o-ring made of rubber seals the opening on the outside. This will let oil reach the timing gears, which is great. It saves us from taking everything apart to re-grease it later. Disassembling everything is a lot of work just to re-grease the timing set after many hours of effort.
They've already addressed that and planned forward, which is a great thing. The dual carbs, the brackets, and the starter motors—all of which have the same gear on them—are essentially the same as the rest of the engine.
Many items work well with the TOYAN V8 Nitro Engine FS-V800 RC Engine Model Building Kits 28cc. Companies like TOYAN, CISON, and ENJOMOR are making strong starter motors with gears instead of belts. They are observing what works and making improvements in the early stages of building engine models.
It's the baby stage. They had a problem with the TOYAN FS-L400 14cc Engine for RC models, but they are fixing it by making changes and replacing parts. They are working on solving the issue.
Think about this: Six years ago, the Italian 100 engines were released and they are still good. It's uncertain how long they will last, as some are nitro-powered and expensive to run. Nitro fuel costs around fifty dollars per gallon.
These engines will now run on petrol mixed with oil, like the engine over there. We can start it once the HOWIN 21cc Inline 6 Gas Engine DIY Model Kits Starter Kit arrives.
I get so delighted when I hear a newborn cry. When you first start an engine, you can feel how it will operate, tune it, and then put it into anything.
